ezCheckPersonal for Mac: Check Setup
With ezCheckPersonal mac, you can print the pocket-sized personal checks in house easily. You can follow this guide to set up the checking account.
1. Click the top menu "Settings->check setup" to open the check setup page.
.

2. Enter the check information
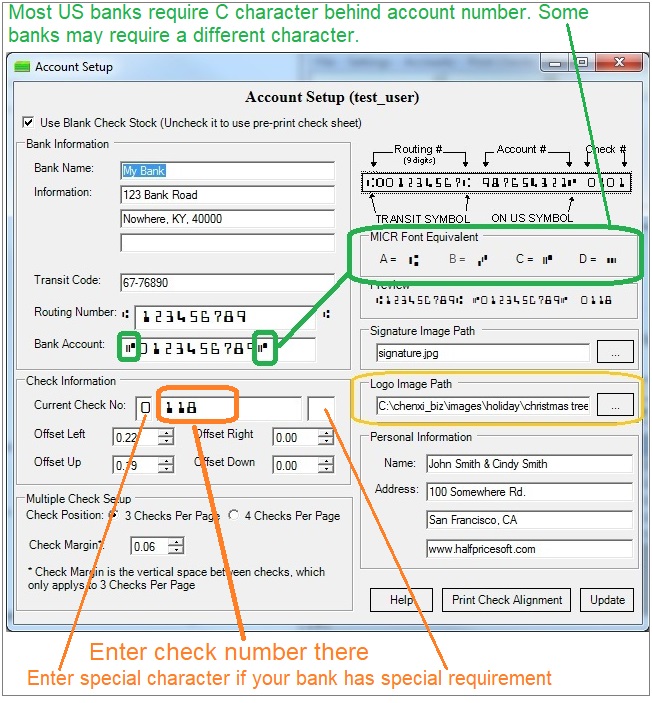
- Blank check stock or pre-printed check
If you will use blank check stock, check the option "Use Blank Check Stock". Otherwise, uncheck it.
- Bank information
Please enter the bank information here. Bank information is required. If you select to use pre-printed check, you can leave the default sample data here.
- Transit code (optional)
This information is optional. If you have this data on your previous check, you can enter it. Otherwise,
you can leave this field blank. US banks will not use this information to process checks today.
- Check position
ezCheckPersonal supports blank check stock and pre printed checks for 3-per-page or 4-per-page format.
- Current check number
You can enter the starting check number here. ezCheckPersonal will increase it automatically when you add a new check.
- Offset left/right/up/down
Most customers can leave the values as 0 (zero). You can adjust the value to print check higher or lower if your printer is special.
- Images
You can choose your own logo image and signature images here. If you do not want to use images, you can delete the data and leave these fields blank.
- MICR line
The MICR line format of ezCheckPersonal checks is:
"THE ROUTING, THE ACCOUNT NUMBER and CHECK #"
Related Links:
ezCheckPersonal Quick Start Guide
How to print blank check to fill in manually later
How to use ezCheckPersonal With Quicken
How to use ezCheckPersonal With QuickBooks
ezCheckPersonal FAQs
Troubleshooting